Tile and grout cleaning is the process of removing embedded dirt, stains, mold, and mildew to restore the appearance and hygiene of your tiled surfaces. Most homeowners scrub harder when results disappoint, but technique and product choice matter far more than elbow grease. The right combination of baking soda, hydrogen peroxide, or a commercial cleaner applied with proper dwell time will outperform aggressive scrubbing every time. Whether you are dealing with a bathroom floor that has yellowed over months or a kitchen backsplash with grease buildup, this guide gives you a clear, step-by-step path to cleaner tile and longer-lasting grout.
What tools and products you need for tile and grout cleaning
Effective tile and grout cleaning starts with having the right supplies before you touch a single tile. Walking into the job without the correct tools is the fastest way to waste time and potentially damage your surfaces.
Essential tools:
- Stiff-bristle scrub brush or an old toothbrush for grout lines
- Microfiber cloths for wiping tile surfaces without scratching
- Spray bottles for applying liquid solutions evenly
- A bucket and mop for floor tiles
- Rubber gloves and an N95 mask when working with bleach or strong cleaners
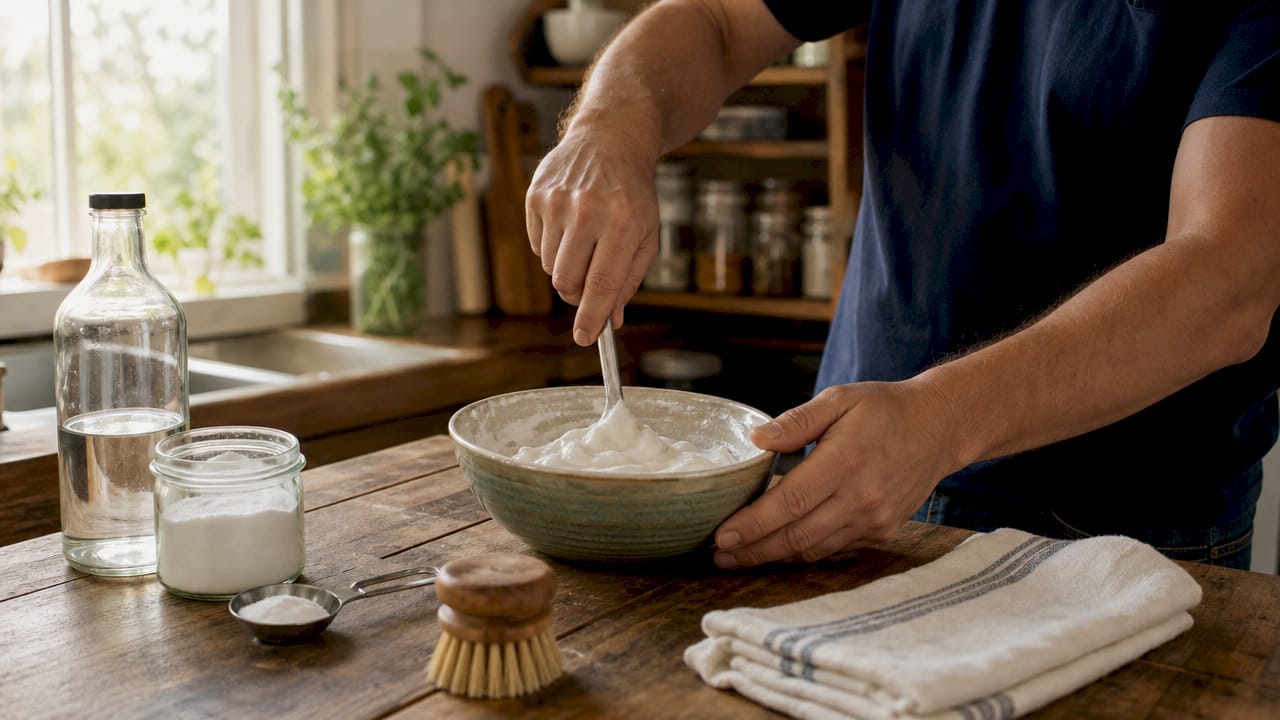
Cleaning agents fall into two categories: homemade and commercial. A baking soda paste mixed with hydrogen peroxide is a gentler alternative to bleach, making it ideal for maintenance cleaning and lighter stains. Baking soda provides mild abrasion while hydrogen peroxide delivers a controlled bleaching effect, so the combination targets both surface grime and discoloration without stripping grout sealers. For tougher mold or deep bathroom staining, EPA Safer Choice labeled commercial products offer stronger chemistry while keeping your home safe.
One product to avoid: vinegar. Vinegar damages grout and etches natural stone tile surfaces because of its acidity. Many homeowners reach for it instinctively because it works on other surfaces, but on tile and grout it degrades the joint material over time.
| Cleaning agent | Pros | Cons |
|---|---|---|
| Baking soda + hydrogen peroxide | Gentle, non-toxic, safe for colored grout | Less effective on heavy mold or deep stains |
| Commercial grout cleaner | Stronger formula, faster results | Can contain harsh chemicals; read labels carefully |
| Bleach solution (diluted) | Kills mold and mildew effectively | Risk of discoloration on colored grout; requires ventilation |
| Dish soap + warm water | Safe for routine maintenance | Not effective for set-in stains or mold |
How to clean tile floors and grout lines step by step
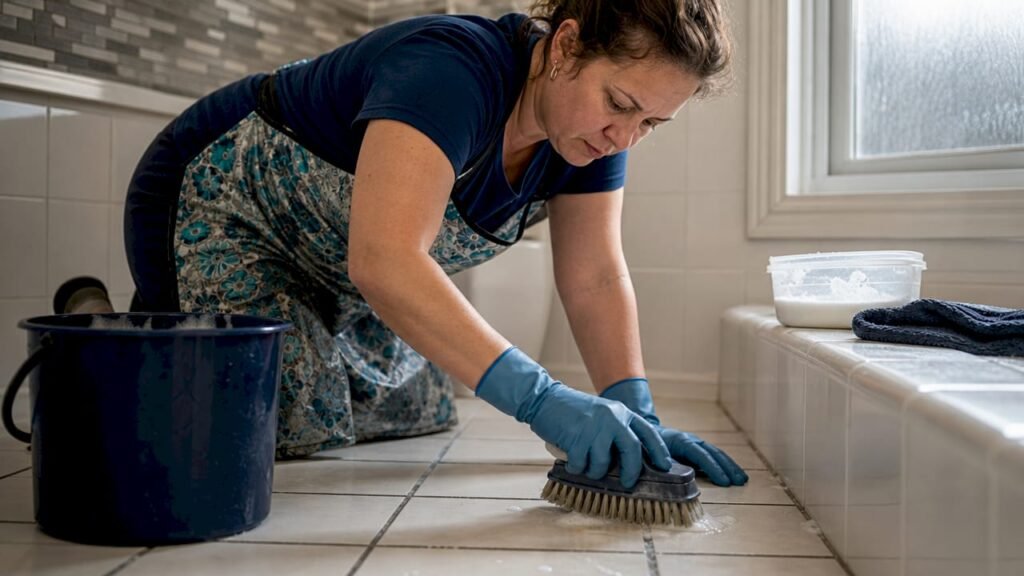
The most common mistake in grout cleaning is treating it the same as cleaning a tile surface. Grout is porous. Dirt and mold live inside those pores, not just on top. Effective grout cleaning depends on agitation and reaction time to lift embedded grime, not just wiping across the surface.
Follow these steps for deep grout stain removal:
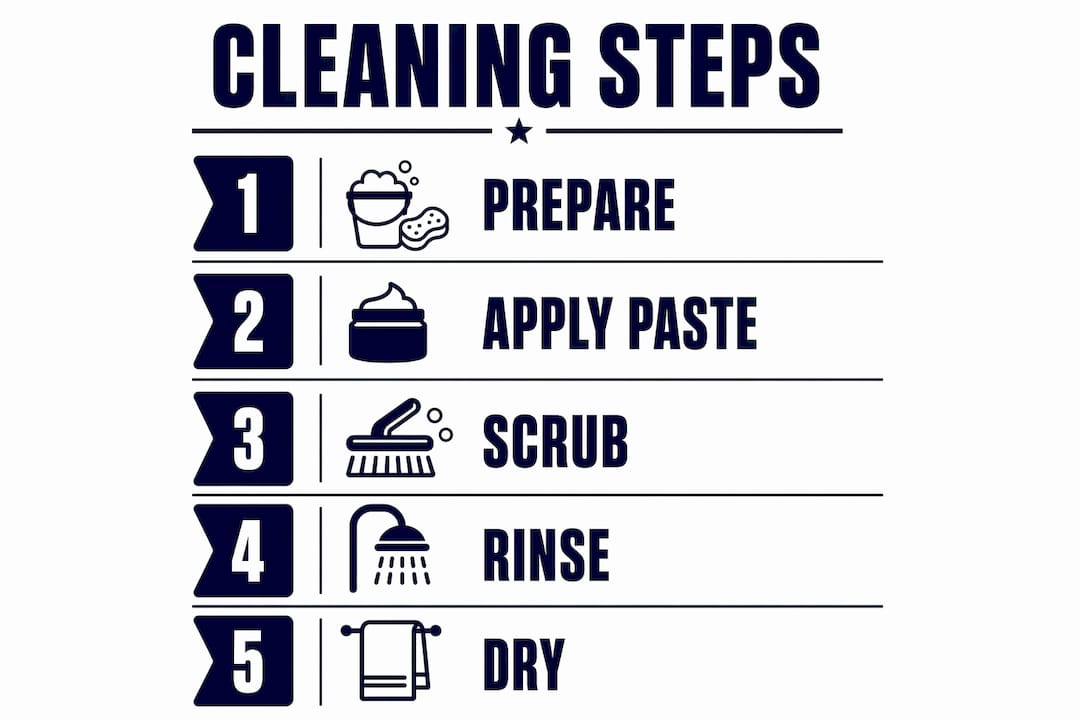
- Clear and sweep the area. Remove any furniture, rugs, or loose debris. Sweep or vacuum the floor so loose dirt does not turn into mud when wet.
- Apply your cleaning solution. Spread a baking soda paste directly onto grout lines, or spray a commercial cleaner according to the label. For mold or mildew, mix 3/4 cup of household chlorine bleach with 1 gallon of water and apply it to the affected grout. Let the solution sit for several minutes before scrubbing. This dwell time is what breaks down the stain at the pore level.
- Scrub the grout lines. Use a stiff-bristle brush and work in small circular motions directly along the grout joint. Do not scrub diagonally across multiple lines at once. Focus pressure on the grout, not the tile face.
- Rinse thoroughly. Use clean warm water and a mop or damp cloth to remove all cleaning residue. Leftover cleaner attracts new dirt faster than a clean surface would.
- Dry the surface completely. Use a dry microfiber cloth or allow adequate airflow. Wet grout left to air dry in a poorly ventilated space is an invitation for mildew.
- Inspect and repeat if needed. Some stains require two rounds, especially if grout has not been cleaned in over a year.
Pro Tip: Always test your cleaning solution on a small, hidden section of grout before applying it to the full area. Some agents, particularly peroxide and bleach, can lighten grout color if used carelessly on colored grout.
For routine cleaning between deep sessions, warm water and a few drops of dish soap applied with a microfiber mop keeps tile surfaces clean without risking grout damage. Save the stronger solutions for quarterly or biannual deep cleans.
How to maintain tile and grout to prevent stains and mold
Cleaning restores your tile. Maintenance keeps it that way. The two most common reasons grout deteriorates faster than it should are skipping the sealer and ignoring moisture after showers or cooking.
Grout sealers wear off over time, leaving the porous joint exposed to moisture, mold, and discoloration. Resealing every six months is the standard recommendation for high-traffic or wet areas like bathrooms and kitchens. In lower-traffic areas, once a year is sufficient. Applying a sealer takes less than 30 minutes and prevents hours of future scrubbing.
Daily and weekly maintenance habits that make a real difference:
- Use a squeegee on shower walls and floors immediately after each use to remove standing water
- Run the exhaust fan during and for 15 minutes after every shower to reduce humidity
- Wipe tile surfaces dry after cooking near a backsplash to prevent grease film buildup
- Sweep or vacuum tile floors at least twice a week to stop grit from grinding into grout
- Spot-clean spills immediately rather than letting them soak into unsealed grout
Moisture control after showers is one of the most effective ways to prevent mold growth and yellowing grout over time. A dry environment reduces mildew buildup and keeps grout looking cleaner between deep cleaning sessions. This is especially relevant in Illinois homes during winter, when windows stay closed and indoor humidity rises.
Professional cleaning becomes necessary when grout has darkened significantly despite regular maintenance, when mold appears repeatedly in the same spots, or when sealing no longer seems to hold. At that point, surface-level DIY methods will not reach the depth of contamination. For grout with visible mold growth, reviewing a mold remediation guide before proceeding with cleaning is a smart first step.
DIY vs. professional grout cleaning: which one do you need?
DIY grout cleaning works well for regular maintenance, light staining, and surfaces that have been kept up consistently. A baking soda and hydrogen peroxide paste handles most household grout discoloration without any special equipment. Dish soap and warm water cover routine tile surface cleaning between deeper sessions. These methods cost almost nothing and are safe for most tile types when used correctly.
The limitations of DIY become clear with heavy mold, years of buildup, or grout that has lost its sealer entirely. Scrubbing harder does not compensate for the lack of heat and pressure that professional equipment delivers.
Professional steam cleaning is considered the most effective method for deep grout restoration, offering results that DIY scrubbing cannot match. Industrial steamers reach temperatures that kill mold spores and bacteria at the source, and microfiber pad attachments lift embedded soil from both grout and tile surfaces more efficiently than manual brushes. The physical effort required drops significantly, and the results are consistent across the entire floor rather than patchy.
| Factor | DIY cleaning | Professional cleaning |
|---|---|---|
| Cost | Low (under $20 in supplies) | Higher upfront investment |
| Time | 1 to 3 hours per room | 30 to 90 minutes per room |
| Effectiveness | Good for light to moderate stains | Superior for deep stains, mold, and restoration |
| Safety | Safe when products are used correctly | IICRC-certified technicians handle chemical safety |
| Equipment | Brushes, spray bottles, household cleaners | Industrial steamers, commercial-grade solutions |
Safety is a real consideration when bleach enters the picture. Bleach-based treatments should be tested carefully on colored grout and used only periodically for mold and mildew, not as a routine cleaner. Repeated use of harsh acidic or bleach-based products degrades grout sealers and weakens the grout joint itself over time. For grout sealing guidance after a professional clean, working with a specialist who understands the chemistry of your specific tile type prevents costly mistakes.
Pro Tip: When selecting a professional tile and grout cleaning service, ask specifically whether technicians are IICRC certified. Certification confirms they follow industry-standard protocols for both cleaning effectiveness and chemical safety.
Key takeaways
Consistent tile and grout maintenance, combining the right cleaning agents, proper technique, regular sealing, and moisture control, is the most reliable way to preserve both appearance and hygiene long-term.
| Point | Details |
|---|---|
| Use the right cleaner | Baking soda and hydrogen peroxide handle most stains; bleach targets mold but requires careful use. |
| Dwell time is non-negotiable | Letting cleaners sit for several minutes breaks down grime inside porous grout before scrubbing. |
| Seal grout every six months | Resealing prevents moisture intrusion, mold growth, and discoloration in high-traffic wet areas. |
| Control moisture daily | Squeegees and exhaust fans after showers reduce mildew buildup between cleaning sessions. |
| Know when to call a professional | Deep staining, recurring mold, or failed sealers require industrial steam cleaning, not harder scrubbing. |
What I have learned from watching homeowners tackle grout the wrong way
After seeing hundreds of tile and grout jobs, the pattern is almost always the same. Homeowners wait too long, then reach for the harshest product they can find, and scrub until their arms give out. The grout looks marginally better for a week, then reverts. The problem is not effort. It is sequence and chemistry.
The homeowners who get lasting results do two things differently. They seal their grout on a schedule, and they treat moisture as the real enemy rather than the visible stain. The stain is just the symptom. Moisture that sits in an unsealed grout joint is what feeds mold, weakens the joint, and causes the gray or black discoloration that no amount of scrubbing fully removes.
My honest take on the DIY versus professional debate: DIY is absolutely worth doing for maintenance. But if you have been cleaning the same grout for two years and it still looks dark, you are past the point where a paste and a brush will solve it. A professional steam clean resets the surface to a baseline that your regular maintenance can actually maintain. Think of it as the difference between mopping a floor and stripping and refinishing it. Both are valid. They just serve different purposes.
One more thing worth saying: skip the vinegar. It is everywhere on cleaning blogs, and it genuinely damages grout over time. Warm water, dish soap, baking soda, and hydrogen peroxide cover 90% of what you need at home. Save the stronger chemistry for when it is actually warranted.
— John
How Masterservicepro can restore your tile and grout
When DIY methods have reached their limit, Masterservicepro brings IICRC-certified technicians and professional-grade equipment directly to your home in Lake County, Cook County, DuPage County, Will County, and Kane County, IL.

Masterservicepro handles tile and grout cleaning as part of a broader home restoration approach. If mold has taken hold beneath or around your tiles, the team provides full mold removal services to address the source, not just the surface. For homes affected by water damage or a flooded basement where tile areas have been compromised, flooded basement cleanup is also available under one roof. Contact Masterservicepro for an estimate and get your tile surfaces back to clean, safe, and sealed.
FAQ
What is the best homemade grout cleaner?
A paste of baking soda mixed with hydrogen peroxide is the most effective homemade option for grout stain removal. Apply it directly to grout lines, let it sit for several minutes, then scrub with a stiff-bristle brush and rinse thoroughly.
How often should you clean and reseal grout?
Deep clean grout every three to six months in high-use areas like bathrooms and kitchens, and reseal grout every six months to one year. Regular sealing prevents moisture from penetrating the porous joint and causing mold or discoloration.
Can you use vinegar to clean tile and grout?
Vinegar is not safe for grout or natural stone tile. Its acidity damages grout integrity and etches stone surfaces over time. Use warm water with dish soap for routine cleaning instead.
When does grout cleaning require a professional?
Professional grout cleaning is warranted when stains persist after multiple DIY attempts, when mold reappears consistently, or when grout has darkened across a large area. Industrial steam cleaning reaches depths and temperatures that household tools cannot match.
Is bleach safe to use on grout?
Diluted bleach, mixed at 3/4 cup per gallon of water, effectively removes mold and mildew from grout. Test it on a hidden area first, especially with colored grout, and avoid using it as a routine cleaner since repeated exposure degrades grout sealers over time.